NOTE: IT CAME TO MY ATTENTION THAT THE NEW STYLE OF VIDEO LINK AT THE END OF THIS POST IS "ACTIVE-X ENABLED", AND FOR SOME USING INTERNET EXPLORER YOU MAY NOT SEE THE LINK AT ALL UNLESS YOU "ENABLE" ACTIVE-X FOR THIS VIDEO. IN THE FUTURE YOU CAN GO TO "TOOLS", THEN "INTERNET OPTIONS", THEN "SECURITY" AND LIST THIS WEBSITE AS AN 'ALLOWED' SITE. FUTURE VIDEOS WILL THEN SHOW UP, AS I PLAN ON DOING MORE IN THIS FORMAT. SORRY FOR ANY TROUBLE THIS MAY HAVE CAUSED SOME OF YOU!
-------------------------------------------------
(CLICK ON PICS TO ENLARGE)
-------------------------------------------------
(CLICK ON PICS TO ENLARGE)

PigPen is who I looked like last weekend as I was carving out this particular walking cane branch flute. It's now ready for sanding and finishing, and I thought I'd share it with you and try something new: shooting a video and putting it on the website. I'm sure those will get better, but at least it's a start and a nice new twist to the blogs.
Inbetween showers I went on the back deck to shoot the video below just once. Looking for more storms today, so not sure if and when I can get the sander outside to start finishing up. I'll start with a pic of the flute that is presently 38.5" long/tall. For my first 3 branch flutes (and next 2) I'm using relatively straight pieces of old, downed/dead cedar that I pick up on occasion when I walk Mercy. While I didn't take a picture of what it looked like before, I took a picture of it up against another potentail walking cane 'branch' flute that has already been cut in half and retaped for later carving...
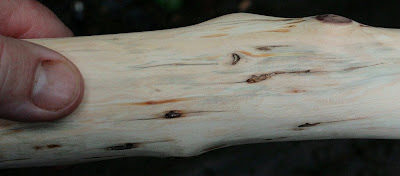
 "Branch" flute is a bit of a misnomer as this particular piece is not a branch but the main trunk. As a result, it has more of the white sapwood around the rich red heartwood center...as I sand the red streaks may or may not show up, so it's always fun to 'see whatcha get' and, regardless, it's always pretty when it's been sanded and rubbed down with oil. Nothing like the texture of wood...
If you want to shoot a tricky shot, hold a cane in a left hand and stick your right hand out and blindly shoot back at yourself!
 Though it doesn't show up too well, I scallopped around each finger hole using the edge of my orbital palm sander, and it makes for a very comfortable grip. May try that more in the future with the branch flutes...the flute is also surprisingly light in weight, not only because it's mostly hollow inside, but the old dry wood is light weight to begin with.
 I never was sure from the start what I was going to do with this flute, so I played it safe and did not bore all the way to the end of the flute...if I do let this be a cane, the added 'beef' at the bottom would be good to have. I have the option of not going with a 'cane' idea and cutting off the solid section and it won't effect the flute as I've already established the 'musical' barrel length by putting in tuning holes. Yet another option is to use the 4" long solid area to carve something neat and let it be an ornate branch flute...things that make you go 'hmmmmm.....'
 It may be that the 'red' is not far under the surface, but there is plenty of character in the wood as it is...and I definitely want to oversand and change the 'natural' look and feel of it...
 Flute-making is a on-going experiment...and on the next one I think I'll 'de-shag' the bark before cutting it in half...the reason is that with these particular pieces I've picked up and used for flutes, they have numerous cracks in them. The one below just happened to run along the top of the flute, but I didn't see it until after I'd cut out the 'nest' where the block sits, establishing the 'top' of the flute. It's easily neutralized with one of 3 viscosities of professional CA glue (cyanoacrylate or 'super' glue) that I allow to soak into the fibers over a few doses, and it looks neat when done. It's just that this big 'un had a whole lot of little cracks and openings and it took some time to get them all. You would be amazed how the tiniest of air leaks, cracks, can stop or significantly alter the sound quality of a flute...
 I kept the end rounded off for now...still at that experimental stage on whether to make a leather bonnet to go over it while you use it as a cane, or get fancier with a 'handle' of sorts that pops on and off...mulling all that over. Plenty of rich, purple-red heartwood in the center, for sure!

And now for your viewing pleasure, the cane flute in action. At first it was a low B, but after tapping holes the fundamental was just not comfortably solid enough for me, so i lifted it a half step to low C. And without boring you with details, it all came together as a low C# using Verdi frequencies (I'm tellin' ya, I really like the stuff!). Enjoy! (FYI, videos don't enlarge, and you have to hit the arrow in the bottom left to play...audio comes out surprisingly clear!)
Inbetween showers I went on the back deck to shoot the video below just once. Looking for more storms today, so not sure if and when I can get the sander outside to start finishing up. I'll start with a pic of the flute that is presently 38.5" long/tall. For my first 3 branch flutes (and next 2) I'm using relatively straight pieces of old, downed/dead cedar that I pick up on occasion when I walk Mercy. While I didn't take a picture of what it looked like before, I took a picture of it up against another potentail walking cane 'branch' flute that has already been cut in half and retaped for later carving...
 "Branch" flute is a bit of a misnomer as this particular piece is not a branch but the main trunk. As a result, it has more of the white sapwood around the rich red heartwood center...as I sand the red streaks may or may not show up, so it's always fun to 'see whatcha get' and, regardless, it's always pretty when it's been sanded and rubbed down with oil. Nothing like the texture of wood...
If you want to shoot a tricky shot, hold a cane in a left hand and stick your right hand out and blindly shoot back at yourself!
 Though it doesn't show up too well, I scallopped around each finger hole using the edge of my orbital palm sander, and it makes for a very comfortable grip. May try that more in the future with the branch flutes...the flute is also surprisingly light in weight, not only because it's mostly hollow inside, but the old dry wood is light weight to begin with.
 I never was sure from the start what I was going to do with this flute, so I played it safe and did not bore all the way to the end of the flute...if I do let this be a cane, the added 'beef' at the bottom would be good to have. I have the option of not going with a 'cane' idea and cutting off the solid section and it won't effect the flute as I've already established the 'musical' barrel length by putting in tuning holes. Yet another option is to use the 4" long solid area to carve something neat and let it be an ornate branch flute...things that make you go 'hmmmmm.....'
 It may be that the 'red' is not far under the surface, but there is plenty of character in the wood as it is...and I definitely want to oversand and change the 'natural' look and feel of it...
 Flute-making is a on-going experiment...and on the next one I think I'll 'de-shag' the bark before cutting it in half...the reason is that with these particular pieces I've picked up and used for flutes, they have numerous cracks in them. The one below just happened to run along the top of the flute, but I didn't see it until after I'd cut out the 'nest' where the block sits, establishing the 'top' of the flute. It's easily neutralized with one of 3 viscosities of professional CA glue (cyanoacrylate or 'super' glue) that I allow to soak into the fibers over a few doses, and it looks neat when done. It's just that this big 'un had a whole lot of little cracks and openings and it took some time to get them all. You would be amazed how the tiniest of air leaks, cracks, can stop or significantly alter the sound quality of a flute...
 I kept the end rounded off for now...still at that experimental stage on whether to make a leather bonnet to go over it while you use it as a cane, or get fancier with a 'handle' of sorts that pops on and off...mulling all that over. Plenty of rich, purple-red heartwood in the center, for sure!
And now for your viewing pleasure, the cane flute in action. At first it was a low B, but after tapping holes the fundamental was just not comfortably solid enough for me, so i lifted it a half step to low C. And without boring you with details, it all came together as a low C# using Verdi frequencies (I'm tellin' ya, I really like the stuff!). Enjoy! (FYI, videos don't enlarge, and you have to hit the arrow in the bottom left to play...audio comes out surprisingly clear!)
If this works well enough, I'll go back and make samples of the first two Verdi flutes I blogged about, the low E and my first 'branch' flute in A. That is, as long as more tornadoes aren't whipping around close by today...!


1 comment:
Love your work, inspirationanl stuff indeed. I build segmented and stave drums and MUST give this a try in the New Year.
Post a Comment