DON'T FAINT...THE NEW WEBSITE IS UP!
Check back for updates like sound samples and
other pages in the days ahead!
Check back for updates like sound samples and
other pages in the days ahead!


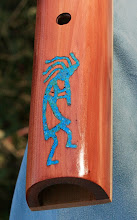
 Block: Claro Walnut "Thunderbird" with Turquoise


 What's peculiar about photography sometimes is how certain colors don't translate exactly; while the Heron's head looks rather light and blue, it's grayer and darker...tweak as I might I couldn't get a great match, but you get the idea!
 In the picture, the mouthpiece is to the left and the exit holes to the right...the block and sound board area sits just to the right of the knob area, top left. Again, just a good ol' dead branch I picked up where I walk Mercy sometimes, with one significant crack/split that runs the length of much of the bottom of the flute.


 This is my tuning hole group...I cut the first one closest to the end (right) and check the flute's fundamental...through experience I can just tell if it's too low by the qualities of the root note. So I cut another....then another...until I found a really sweet, strong note that 'spoke' to me.
 In the earlier Dogwood branch flute post I mentioned, I cut it along its major crack line and discovered some inherent problems compounded by doing that. For this flute, I cut the branch in half on a plane perpendicular to the large crack. I could have done the ol' cedar dust and runny CA glue trick as before to fill it in, but I felt like adding a splash of color this time. It's actually green Malachite, but I didn't compensate for the blue-shift in the shaded area I photographed in late yesterday...
 The boring insect 'designs' made for neat patterns...this one the letter "V" which I'll say is for Verdi...the crack did go all the way through to the inside of the barrel I carved out, so I put a layer of thick CA glue on the inner opening to give me a base to pour in the crushed stone and powder from the outside.
 The 'foot' of the flute is neat in that I opened up the two holes at the split...and learned the hard way that when you work with a flex-shaft power carving tool that you canNOT let the cutter head hit two surfaces at once, lest you eventually break the inner shaft from the resulting sudden torque and chatter when you get too tightly in on an area (should have gone to a smaller bit instead of one that was only a tad smaller than the hole).
 "Hey, Bob, sounds like you broke the shaft!?!"
 Well, that's all for now. I've also been salvaging older flutes that were collecting dust, unfinished for some technical design or musical issues, and have had good successes 'repairing' them. Been kinda sorta like the old adage I'm reminded of...
 ...the now-Ugly-Boy when it was just a throw-away stick...
  For those that had any trouble seeing it, I did a little key fer ya...
 This flute is just loaded with interesting patterns...

 As above and below, there were voids that I had to fill in...while I could have used something like Turquoise or malachite, I decided to stay 'natural' and used cedar dust. I simply would add a watery superglue and press the dust in, then 'water' the top with the watery glue. Makes a rock-hard and pretty inlay, if I do say so myself.
 I mentioned in yesterday's post about avoiding sticks with pronounced splits, as such cracks are rarely singular in nature or on the same plane. Case in point for this flute as a couple of large pieces flew off when cut with the saw and also with the Kutzall bit I used to rout out the chambers. In this case it was easier to fill it in as opposed to go look for the wood or try to custom fit some odd piece in the void...all part of the 'on the fly' decisions I have to make.
  Here are a few views of the almost-finished flute, the High B "Howler"...


 Not too bad a transformation of kindling, eh? Carpe diem, y'all!
 I vowed to collect some of the 'trash' Cedar and Dogwood trees and incorporate them into flutes, so that they could be a part of healing music to go back out into the world in a positive way. I wasn't thinking branch flutes at the time, but I would still start at the same place regardless of what flute style I made. After the dust settled, I began to scout for good specimens...
 Of course, the possibilities were almost unlimited...what was limited was a space to store selections since it would take a couple of years for 'green' wood to dry. However, this area had some 'dead standing' trees already, which is preferable to dead trees lying on the ground where they can rot more quickly over the years. I was able to use some of the dead Cedar immediately as it was already dry, and just recently began incorporating Dogwood. Now that I've started making some branch flutes, I go back to the area and still rather easily find some pretty good wannabes, which is why I carry a handsaw under Mercy's quilt in the back of the car!...
 This post is about just one particular piece I began to finish up last week, a piece I could have easily argued wasn't worth looking at twice and passed over. I think it might be an old Dogwood branch, but it was so 'dead' already I couldn't tell with much confidence. It was a hardwood that was now softer inside thanks to initial drying and decay.
 I did lightly knock off what bark was left on this dead branch so that I could get a better look at what cracks and blemishes were where; too, you have to envision which end will be the mouthpiece...which will be the foot...where the sound hole 'nest' will go...which will be the more ergonomic placement for finger holes...where the musical 'end' of the flute will be so you can drop in a tuning hole(s) to keep more of the stick for aesthetics...
 Since this is all still new to me and a constant work in progress, I will be shying away from flutes with noticeable cracks, unless they are solitary ones. The process is that I cut the branch in half with a band saw, cut out the insides with various tools to specifications I draw up for a particular branch, then glue it back together. With large cracks, they are rarely straight up and down and in one plane; rather, they usually exist in groups on multiple planes, and when you make a cut with a band saw, which is one plane, or even in the hollowing stage, you risk cracked pieces flying off as you cut into the flute, many times making the wood firewood!
 I'm obviously leaving a lot out about, say, how I know I need a tuning hole in that particular location, etc. That's a function of the approximate diameter of the bore I'm cutting out versus length of barrel I cut out...which has as the starting point at the 'nest' area and the TSH (true sound hole, in front of the block)...if you think there is a lot of blind trust and faith in this process, you are correct! But that's the beauty of being an artist and making unique creations: there ain't no guide book. You go within and listen to your intuition and follow your inspiration.
 It just so happens I tuned all of these to Verdi frequencies..today's is a high B...the top one pictured is a high C#....followed by a lovely straight, bright mid G...and then the bottom Bahama Mama is a bass A# that would astound you by how very little breath it takes to play and still get a rich, full tone.